Articles
Send and receive 5.1 DTS/AC3 signal via Optical SPDIF
The UT23 USB to optical converter and DACs with an optical out (UAE23, UAE23HD, UH1) can send 5.1 Dolby digital DTS and AC3 audio. It’s important to understand that 5.1 audio sent over optical is always sent as an encoded and compressed stereo track. This is not only the case for Hifime devices, it’s the same for all SPDIF optical devices. The output from the UT23 (or other sending device) will appear as a stereo 2 channel track, even when 5.1 is enabled. The receiving device will decode the stereo audio track to 5.1. Also keep in mind that not all programs support 5.1 DTS output.
To use the 5.1 output in Mac with VLC player:
- Set system volume level to 100% (important!)
- Select the UT23 as the output device
- Open the Audio Midi Setup application (inside Utilities folder in the Applications folder)
- Set the sample rate to 48kHz 16 bit or the sample rate of the audio/video file you’re sending
- In VLC open preferences and click Show All (settings) button
- In the top Audio tab enable “Force S/PDIF support” and set “Stereo audio output mode” to Dolby Surround
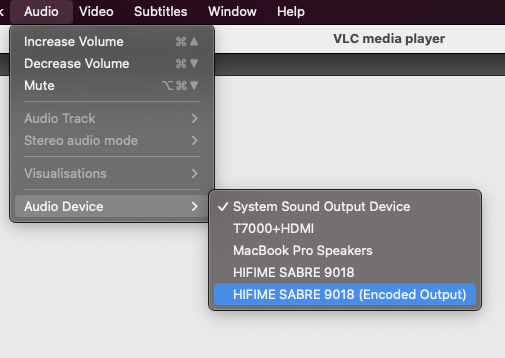
- In the Audio tab in menu bar go to “Audio device” and select the Hifime device with the “(Encoded output)”

When playing a 5.1 DTS or AC3 file the receiving device should be able to recognise the 5.1 stream.
For other programs the settings will be similar. Note that Netflix currently doesn’t support playing 5.1 from browsers. It’s supported in the Netflix Windows app.
Use 5.1 optical output in Windows with VLC player
- Set system volume level to 100% (important!)
- Open Control Panel and go to Hardware and Sound, then click Sound –> Manage audio devices
- Select the Hifime device and click Properties
- Set the sample rate to 48kHz 16 bit or the sample rate of the audio/video file you’re sending
- Check and make sure the “Exclusive mode” options are enabled (also in the Advanced tab)
- In VLC open preferences and click Show All (settings) button
- In the top Audio tab enable “Force S/PDIF support” and set “Stereo audio output mode” to Dolby Surround
- In the Audio tab in menu bar go to “Audio device” and select the Hifime device with the “(Encoded output)”
The workflow depends on the program you’re using. For example in Potplayer you must select the Output method as DTS Pass Through.
Receive and record 5.1 Dolby Digital DTS and AC3 audio
The UR23 and S2 Digi Optical to USB converters support receiving 5.1 audio in a similar way. However to create a DTS or AC3 file you need to convert the recorded audio to DTS/AC3 manually after recording. You can use Audacity software to record the incoming stream as .wav. Then, for AC3 audio use ffmpeg to convert the file:
ffmpeg.exe -f spdif -i in_audio_ac3.wav -c copy -f ac3 out_audio_ac3.ac3With DTS audio use sox:
sox input.wav -x output.dts.wavPlease share your experiences in the comments below if you have success or issues with sending or receiving 5.1 audio with other programs.

Hello, when I try to record a 5.1 dts or dolby digital signal, with my ur23 I only hear noise.
Using audacity in windows 11.
Sorry for the English, translated by Google
Hi, did you try to convert the files after saving them?
AC3:
ffmpeg.exe -f spdif -i in_audio_ac3.wav -c copy -f ac3 out_audio_ac3.ac3
or try
ffmpeg -vn -i input.wav -c:a ac3 -f ac3 output.ac3
With DTS audio use sox:
sox input.wav -x output.dts.wav
Also, make sure you have set the correct sample rate in the control panel sound devices settings.
Hi, is it possible to receive the 5.1 signal, then immediately decode and output it thru onboard audio?
It’s probably possible, however you’d need to find a program or a way to set that up. It should be possible in linux to route the output to another command instead of to a file. We’ll get back to you if we find a way.
The above ffmpeg command to create an ac3 file from a wav file (with an ac3 recording hidden in it) didn’t work for me on my Mac. Here’s what did work:
1) I had already set up “Audio Midi Setup” like it says above.
2) I captured the recording with Audacity and exported it as a 16-bit 44100 .wav file.
3) Then, I applied my ffmpeg command:
ffmpeg -vn -i input.wav -c:a ac3 -f ac3 output.ac3
Life is good!